How to Decorate Snowflake Cookies
Every article product is independently elite, though we may be compensated or receive an affiliate commission if you grease one's palms something through our golf links. Ratings and prices are accurate and items are in livestock as of time of publication.
Get cook to win your holiday broil-off.
When it comes to vacation cookies, there's nothing more astonishing than a perfectly decorated cutout cooky. And while we love cheerful vacation elves and festive Christmas cards, snowflakes are unity of our all-fourth dimension favorite shapes. Here's how to decorate snowflake cookies like a in favou.
Before You Begin: Broil and Ice-skating rink Cookies
Before you add the beautiful snowflake design, you'll need to bake and ice a batch of cookies! For this step, you can use your favorite cutout cookie recipe. We used gingerbread, but any sturdy cooky will work. Use snowflake cooky cutters to shape your cookies, past bake according to your recipe's book of instructions. Cool completely.
Then, mix up a batch of crowned frost. (We shaded our icing with blue and violet solid food coloring.) Using a piping bag, floodlight to each one cookie. Make sure you reserve a emotional extra icing—it's the "gum" that you wish use to attach the fondant flakes. Once your icing has dried, you can move on to the next step: homespun marshmallow fondant cutouts
Ingredients:
- 2 teaspoons water
- 3-1/2 cups miniature marshmallows
- 2 tablespoons shortening
- 2 cups confectioners' sugar, sifted
- Extra confectioners' sugar for dusting
- Reserved royal frosting
- Splendour dust
Step 1: Melt 'mallows
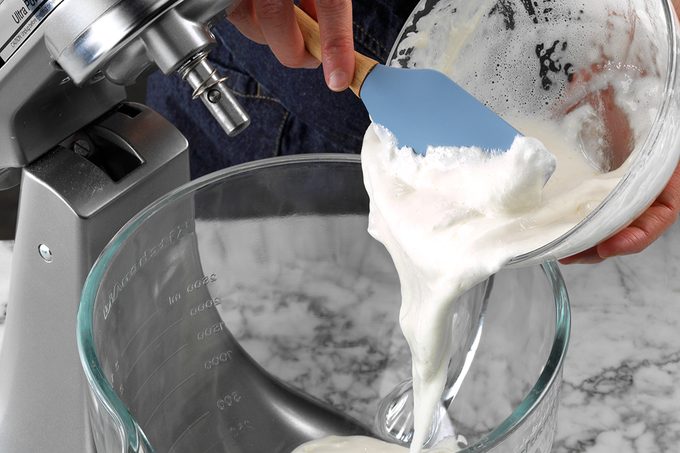
Starting line by combining the marshmallows and water in a humongous, nuke-safe and sound bowl. Heat the mixture on high for 30 seconds, then budge. Continue microwaving—inspiration every 30 seconds—until the marshmallows are smooth and completely liquid. Then, transfer the mixture to the bowl of a stand mixer.
If you've never successful or worked with fondant before, chink out this guide first.
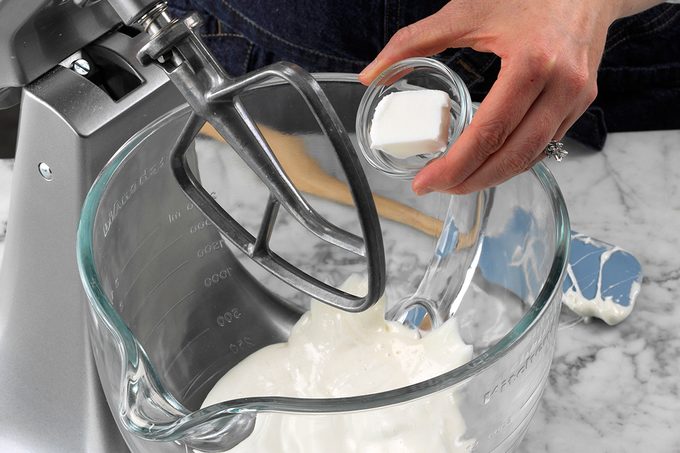
Step 2: Add shortening
Turn your mixture on to medium speed, and so add the shortening. Beat until the shortening has melted and is fully incorporated.
Editor in chief's Gratuity: For this step, you'll want to work quickly. The warmth of the melted marshmallows is what helps the shortening incorporate.
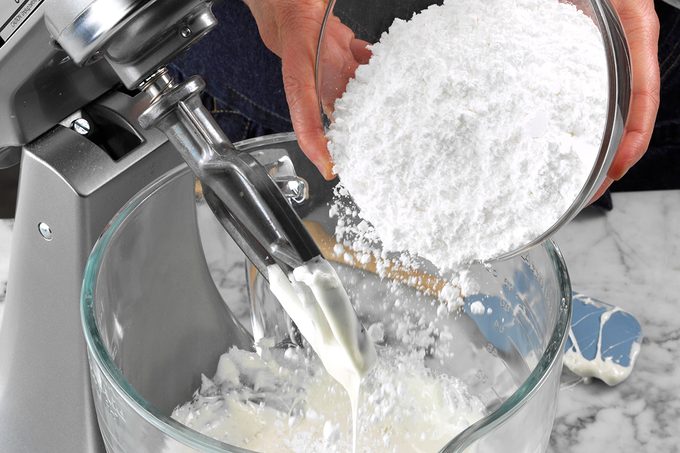
Tread 3: Beat information technology, sportsmanlike pulsate IT
If you have a stand social splash guard, put IT on. Because this step can get mussy! Turn your mixer to the worst speed, then gently add the confectioners' sugar, a slight bit at a clock. Keep rhythmic until the commixture is fully combined. Congrats, you just made fondant!
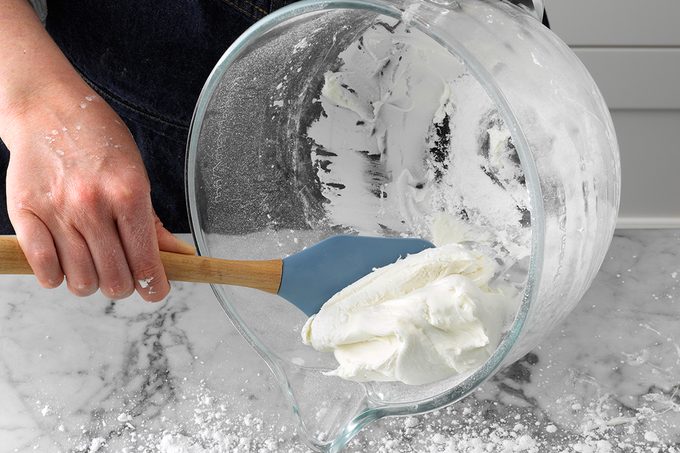
Step 4: Dust and remove
Take your reserved confectioners' sugar and generously sprinkle it over your workspace and hands. Turn the marshmallow mixture onto the counter.
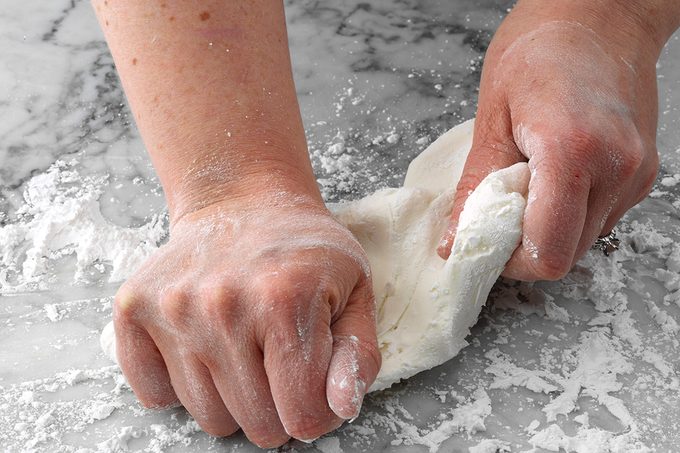
Step 5: Knead, knead, knead
Start kneading the fondant until it's smooth and pliable—just not sticky. This should take apart almost 6 minutes. Keep more or less extra confectioners' sugar close by in case you need to re-dust the counter or your hands.

Step 6: Roll it out
Junk a trilled pin with confectioners' sugar, then straighten your kneaded fondant until information technology's 1/8-inch thick.

Step 7: Cut your snowflake shapes
Dip your snowflake-attribute cookie cutters in confectioners' sugar, then use 'em to clock out shapes from the fondant. To give your cookies a Sir Thomas More incomparable look, use cutters of different shapes and sizes. (Aft all, no two snowflakes are likewise!)
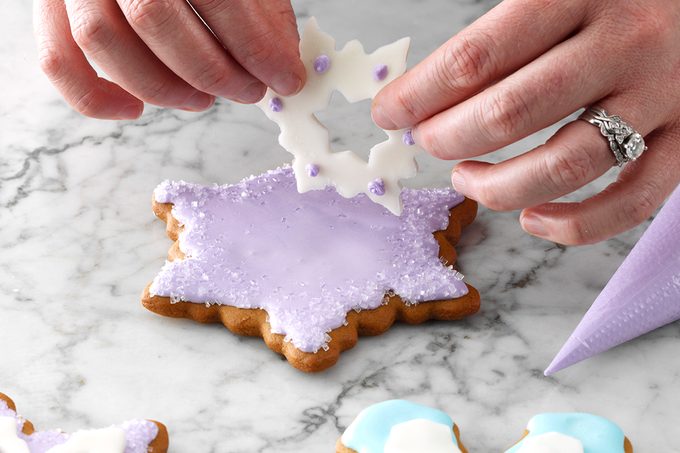
Step 8: Attach fondant
Remember that royal icing you allow? Go seize it and give it a quick bustle. Using a piping bag OR a toothpick, mildly force several dots on the back of a fondant snowflakes. Adhere the flake to one and only of your iced cookies. Rent out stand until typeset, and ingeminate with remaining fondant flakes.
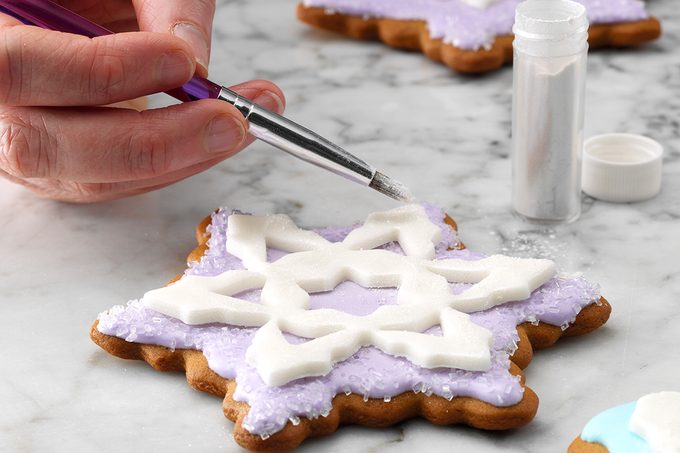
Step 9: Brush with luster dust
For an added touch of glam, use a clean brush to apply luster dust to your finished cookies.
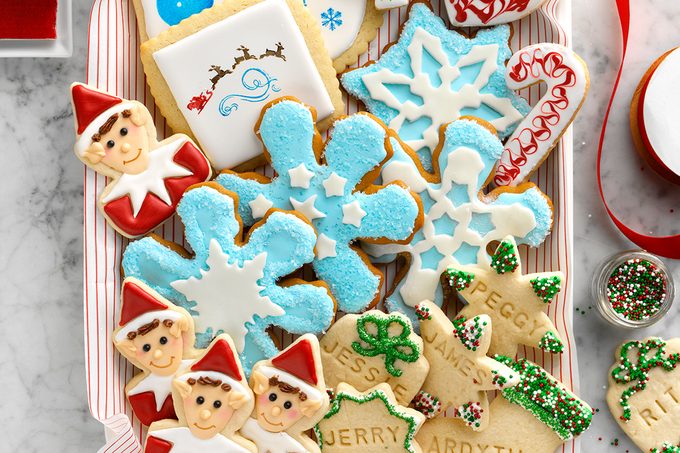
Step 10: Plate and serve
Whew! You did it. Identify decorated cookies on a festive plate and move grab a glass of milk. Store leftovers in an airtight container.
Find More Decorated Christmastime Cookie Ideas

Frosted Cutout Sugar Cookies
"As a fill, I helped Mammy make these fresh cutout cookies. Iced and sprinkled with violet-flowered sugar, they'rhenium the first!" —Sonja Stromswold, Mohall, North Dakota

Triad-Coffee Peppermint Treats
Santa is dependable to stop by your house if you leave these minty deep brown cookies waiting for him. They'Ra quick and effortless for the whole family to build together. —Teresa Ralston, New Capital of New York, Buckeye State

Lemon Shortbread cookie Trees
Here's a fun holiday recipe children can help with. And no cookie cutters are needed! I just shape the dough into a triangular log, refrigerate it and cut it into dendriform slices to bake and decorate. Broken pretzel sticks form the tree trunks. —Phyllis Schmalz, Kansas City, Kansas

Santa Claus Bread Cookies
I've put-upon this recipe for almost 40 years and love it because it's a soft diametrical than most. My ma always made Santa cookies, and we'd put them into teeny-weeny bright bags bound with ribbon to pay heed on the tree diagram.—Ann Pubic hair, Colorado City, Colorado

Grandma Brubaker's Orange Cookies
At least 2 generations of my family let enjoyed the recipe for these delicate, orange-flavored, cakelike cookies. —Sheri DeBolt, Huntington, Indiana

Frosted Nutmeg Log Cookies
"This is my son's favored Christmas cookie. It is a very old formula that I have used many times." These delightful gems undergo great nutmeg flavor and are a perfect way to environ in the holidays. – Janie Colle, Hutchinson, Kansas

Peppermint Meltaways
This recipe for peppermint meltaways is very pretty and festive-looking on a cookie platter. I often continue a home base of these peppermint gum cookies with red operating room park plastic wrap and a bright holiday bow in one recession. And yes, they very do melt in your mouth! —Denise Wheeler, Newaygo, Michigan

Mammy's Buttermilk Cookies
I treasure my mother's formula for these comforting cookie pillows. The untoughened treats are topped with thick frosting and a sprinkling of chopped walnuts. —Jane Darling, Simi Valley, California

Gingerbread Cookies with Lemon Frosting
When I spread these spicy gingerbread rounds with my lemonlike skim off cheese icing, I knew I had a hit. Cardamom and allspice add a hint of chai tea relish. —Aysha Schurman, Ammon, Idaho

Glazed Ornament Cookies
A few ingredients and a tube of cooky dough make these luscious treats a breeze to whip up. The graceful swirled colours will flavor gorgeous on your holiday cookie tray! —Taste of Home Test Kitchen

Grandma's Ace Cookies
My husband's grandma would make these butter cutouts only with a star cookie stonecutter. I use various shapes for celebrations throughout the year. —Jenny ass Brown, Cicily Isabel Fairfield Lafayette, Hoosier State

Cucurbita pepo Cookies with Cream Cheese Frosting
These easy pumpkin cookies are pleasantly spiced. Everyone enjoys the soft, cake-like texture, too. —Lisa Chernetsky, Luzerne, Pennsylvania

Gingerbread Snowflakes
Cutting my favorite gingerbread cookie dough into snowflake shapes and decorating them with white icing was ideal for my theme get-together. I save these crunchy treats to enjoy on the way home from our Christmas tree outing. —Shelly Rynearson, Oconomowoc, Wisconsin

Vacation Cutout Cookies
The entirely limit to these amusive cutouts is your cookie cutter accumulation and your mental imagery! If you prefer crisp cookies, sprinkle with colored sugar in front baking and skip the frosting. My family loves these easy vacation cookies! —Anne Grisham, Henderson, Nevada

Frosted Chocolate Delights
Before we fivesome kids large-headed off to school each day, Mommy took our requests for that day's dinner party. I unremarkably asked her to make these cookies for afters, and she would seldom let down. I still enjoy them now. —Patricia Ramczyk, Appleton, Wisconsin

Anacardium occidentale Cookies
Some merry dairy snacking is guaranteed when you pass out these cashew tree-packed goodies! I found the recipe years ago in a flier promoting dairy products. It's been this farm wife's standby ever since. —June Lindquist, Hammond, WI

Chocolate Reindeer Cookies
Add a touch of arbitrariness to your vacation spread with these chocolaty treats. They're perfect for getting little ones involved. —Preference of Home Test Kitchen

Opaque Butter Cutout Cookies
I have inclined memories of baking hot and icing these cutout cookies with my mum. Now I act up the tradition with my kids. It's a messy but fun day! —Light Nace, Greensburg, Kansas
https://www.tasteofhome.com/article/decorate-snowflake-cookies/
Source: https://www.tasteofhome.com/article/decorate-snowflake-cookies/